


Step 1
Start by sketching the floor plan using a graphite pencil. Use a ruler or straight edge to achieve clean and accurate lines. Focus on outlining the walls, doorways, and any key structural elements. This foundational step ensures that the proportions and layout are correctly captured.
Step 2
Once the sketch is complete, begin adding watercolour washes to the walls and floor. Choose colours that complement the intended design; in this example, Raw Umber and Payne’s Gray have been used. Use light washes for a subtle base and layer darker shades for added depth.
Step 3
Apply watercolour to the furniture, fixtures, and other elements within the floor plan. Start with a light colour palette, then build up to more vibrant hues as details are added. This gradual layering technique brings the objects to life and adds a sense of dimension.
Step 4
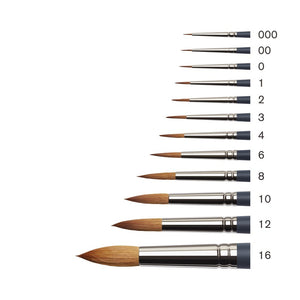
Once the paint is dry, use a 0.1 Fineliner to outline the furniture and decorative items, adding intricate details to complete the rendering. You can also use a small brush, such as a Size 00 Professional Watercolour Synthetic Sable Brush, to apply final touches to areas like parquet floors and wooden doors, using colours like Burnt Sienna and Burnt Umber. Layer the paint to create texture and depth.

![WN PWC KAREN KLUGLEIN BOTANICAL SET [FRONT]](http://www.winsornewton.com/cdn/shop/files/136444.jpg?crop=center&v=1740654068&width=20)
![WN PWC KAREN KLUGLEIN BOTANICAL SET [OPEN 2]](http://www.winsornewton.com/cdn/shop/files/136447.jpg?crop=center&v=1740654068&width=20)
![WN PWC ESSENTIAL SET [FRONT]](http://www.winsornewton.com/cdn/shop/files/137583.jpg?crop=center&v=1740762356&width=20)
![WN PWC ESSENTIAL SET [OPEN]](http://www.winsornewton.com/cdn/shop/files/137581.jpg?crop=center&v=1740762356&width=20)
![W&N GALERIA CARDBOARD SET 10X12ML [B014096] 884955097809 [FOP]](http://www.winsornewton.com/cdn/shop/files/138855.jpg?crop=center&v=1740761853&width=20)
![W&N GALERIA CARDBOARD SET 10X12ML 884955097809 [OPEN]](http://www.winsornewton.com/cdn/shop/files/138856.jpg?crop=center&v=1740761853&width=20)

![W&N PROMARKER 24PC STUDENT DESIGNER 884955043295 [FRONT]](http://www.winsornewton.com/cdn/shop/files/78674_d4d78a69-7150-4bf4-a504-3cb5304b0f80.jpg?crop=center&v=1721326116&width=20)

![W&N PROFESSIONAL WATER COLOUR TYRIAN PURPLE [SWATCH]](http://www.winsornewton.com/cdn/shop/files/136113.jpg?crop=center&v=1724423390&width=20)
![W&N WINTON OIL COLOUR [COMPOSITE] 37ML TITANIUM WHITE 094376711653](http://www.winsornewton.com/cdn/shop/files/9238_5073745e-fcfe-4fad-aab4-d631b84e4491.jpg?crop=center&v=1721326117&width=20)
![W&N WINTON OIL COLOUR [SPLODGE] TITANIUM WHITE](http://www.winsornewton.com/cdn/shop/files/131754_19b392ee-9bf6-4caf-a2eb-0356ec1c660a.jpg?crop=center&v=1721326118&width=20)